cnvkit被设计来处理同一个批次的多个肿瘤配对样本测序情况,首先对所有的normal数据进行bin处理拿到背景值,然后就这个背景值来处理所有的tumor测序数据计算拷贝数变异情况。
该软件使用比较复杂,建议读一读官网教程。所有的命令都被包装到一个python脚本里面,使用该脚本调用一系列字命令,如下:
- Copy number calling pipeline
每个命令都有自己的特殊功能,需要仔细阅读。
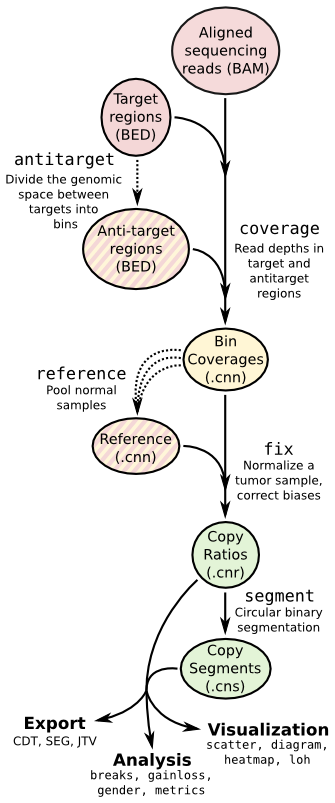
流程图:
流程代码如下:
- cnvkit.py access baits.bed --fasta hg19.fa -o access.hg19.bed
- cnvkit.py autobin *.bam -t baits.bed -g access.hg19.bed [--annotate refFlat.txt --short-names]
-
- # For each sample...
- cnvkit.py coverage Sample.bam baits.target.bed -o Sample.targetcoverage.cnn
- cnvkit.py coverage Sample.bam baits.antitarget.bed -o Sample.antitargetcoverage.cnn
-
- # With all normal samples...
- cnvkit.py reference *Normal.{,anti}targetcoverage.cnn --fasta hg19.fa [--male-reference] -o my_reference.cnn
-
- # For each tumor sample...
- cnvkit.py fix Sample.targetcoverage.cnn Sample.antitargetcoverage.cnn my_reference.cnn -o Sample.cnr
- cnvkit.py segment Sample.cnr -o Sample.cns
-
- # Optionally, with --scatter and --diagram
- cnvkit.py scatter Sample.cnr -s Sample.cns -o Sample-scatter.pdf
- cnvkit.py diagram Sample.cnr -s Sample.cns [--male-reference] -o Sample-diagram.pdf
可以看到软件提供的命令基本上的都用到了,coverage—>fix—>segment—>segment
其实上面这么一大串的命令已经被包装成了一句命令,就是:
- cnvkit.py batch *.bam -r my_reference.cnn -p 8
这个一句话命令与上面的多行代码是等效的,默认的segment算法是 circular binary segmentation algorithm (CBS),也可以用-m切换使用其它算法,比如: faster HaarSeg (haar) or Fused Lasso (flasso)
上面得到的只是segment的结果,还可以call一下:
- cnvkit.py call Sample.cns -o Sample.call.cns
- cnvkit.py call Sample.cns -y -m threshold -t=-1.1,-0.4,0.3,0.7 -o Sample.call.cns
- cnvkit.py call Sample.cns -y -m clonal --purity 0.65 -o Sample.call.cns
- cnvkit.py call Sample.cns -y -v Sample.vcf -m clonal --purity 0.7 -o Sample.call.cns
这个时候需要考虑到已有的vcf变异文件,或者计算好的tumor纯度,或者倍性等等。把segment计算得到的log2 ratio值还原成 0,1,2,3,4这样的拷贝数。
但是,事实上上面的代码一般来说是不能直接使用的,因为我们的测序数据通常是WES数据,需要加上很多参数。
实践运行cnvkit
上面流程很复杂,命令也很多,但是不知道也没关系,用起来其实就一个batch命令即可,当然这个batch命令本身参数也不少,而且被设计用来处理不同的数据情况。
- # From baits and tumor/normal BAMs
- ## 同一批次的所有样本N/T测序数据的bam文件一起运行
- cnvkit.py batch *Tumor.bam --normal *Normal.bam \
- --targets my_baits.bed --annotate refFlat.txt \
- --fasta hg19.fasta --access data/access-5kb-mappable.hg19.bed \
- --output-reference my_reference.cnn --output-dir results/ \
- --diagram --scatter
-
- ## 如果新增加了肿瘤测序数据,就运行下面的
- # Reusing a reference for additional samples
- cnvkit.py batch *Tumor.bam -r Reference.cnn -d results/
-
- # Reusing targets and antitargets to build a new reference, but no analysis
- cnvkit.py batch -n *Normal.bam --output-reference new_reference.cnn \
- -t my_targets.bed -a my_antitargets.bed --male-reference \
- -f hg19.fasta -g data/access-5kb-mappable.hg19.bed
值得注意的就是,如果是全基因组测序数据,用batch --method wgs ,如果是捕获基因组测序,包括全外显子,就用 batch --method amplicon ,然后一定要提供捕获区域的bed文件,一般是外显子加上其侧翼上下游的50bp长度。
人类外显子长度平均是200bp,所以默认的bin是267bp,这样可以把比较长的exon给拆分开来。
还有就是 access 参数需要的文件,
输入输出文件
其中 coverage 命令会对每一个 normal 样本都计算 *.targetcoverage.cnn and *.antitargetcoverage.cnn files , 说明是: target and antitarget coverage tables (.cnn)
这些文件需要合并起来:
- cnvkit.py reference *coverage.cnn -f ucsc.hg19.fa -o Reference.cnn
然后再校正区域测序深度及GC含量,之后变成 copy number ratios (.cnr) 文件。
- cnvkit.py fix Sample.targetcoverage.cnn Sample.antitargetcoverage.cnn Reference.cnn -o Sample.cnr
最后把 copy number ratios (.cnr) 文件用segment算法跑一下即可,输出cns后缀文件的 segment信息。
对于normal样本只需要输出cnn即可,合并成Reference.cnn,然后把一个个tumor样品,根据这个Reference.cnn来计算 cnr,进而计算 cns 。
最后对于cns可以进行call找到真正的拷贝数。
- $ head NPC_merge_marked_fixed.cns |cut -f 1-3,5,8
- chromosome start end log2 weight
- chr1 12098 1701806 -0.183469 84.0794
- chr1 1702902 1752401 -0.962192 4.87216
- chr1 1752901 12777601 -0.220165 370.756
- chr1 12778101 12920301 -1.11688 10.7699
- chr1 12920307 27407686 -0.275998 558.214
- chr1 27408186 125184087 -0.0447404 2418.53
- chr1 143185087 248945922 -0.0422629 2967.61
- chr2 10500 5692985 0.151978 85.3751
- chr2 5692985 90402011 -0.0329165 1874.56
上面的segment结果还可以call一下,如果有需要的话。
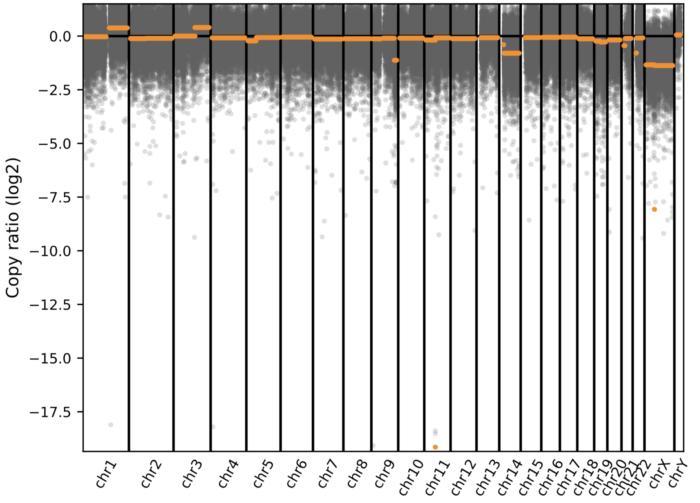
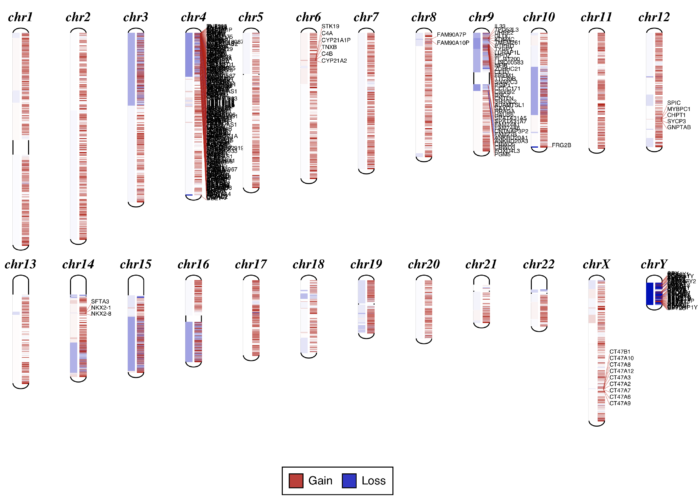
可视化结果:
很明显可以看到有拷贝数变异的区域了。


1F
语法高亮插件出问题了。
B1
@ 木子李 谢谢提醒。问题已经修复。
2F
请问这个报错是什么原因?
Traceback (most recent call last):
File “/home/chen/.local/bin/cnvkit.py”, line 16, in
args.func(args)
File “/home/chen/.local/lib/python3.7/site-packages/cnvlib/commands.py”, line 114, in _cmd_batch
args.count_reads, args.method)
File “/home/chen/.local/lib/python3.7/site-packages/cnvlib/batch.py”, line 76, in batch_make_reference
bam_fname, *autobin_args, bp_per_bin=50000.)
File “/home/chen/.local/lib/python3.7/site-packages/cnvlib/autobin.py”, line 73, in do_autobin
samutil.ensure_bam_index(bam_fname)
File “/home/chen/.local/lib/python3.7/site-packages/cnvlib/samutil.py”, line 55, in ensure_bam_index
pysam.index(bam_fname)
File “/usr/local/lib/python3.7/dist-packages/pysam/utils.py”, line 61, in __call__
save_stdout=kwargs.get(“save_stdout”, None))
File “pysam/libcutils.pyx”, line 345, in pysam.libcutils._pysam_dispatch
File “pysam/libcutils.pyx”, line 127, in pysam.libcutils.force_bytes
UnicodeEncodeError: ‘ascii’ codec can’t encode characters in position 11-12: ordinal not in range(128)